Feeds:
Posts
Comments

Archive for July, 2010

New & New

I’m so glad to have a new handwork project.  This pretty gray skirt was stained this summer  when I geniusly wore it on our camping trip.  I’m using the Alabama Chanin reverse applique technique to give it a whole new look.  Just started…

started

In other shades of “new”, I’m working on expanding do. Good Stitches to include all the many that would like to participate, as well as some new charities.  Today, I found Piecing Hope, which sends quilts to a Christian orphanage in Africa.  If you’re interested in becoming a host of one of our charity circles, please let me know!  Charity suggestions welcome – especially from members and members-to-be!

Read Full Post »

One happy day… your new fabric arrives!  Love, love, love!!!  You admire it in stacks, unfolded, then folded again.  Oh, are you putting it away now?  Already?  WAIT!

Prewash First.
If you don’t prewash now, how will you ever remember which fabrics in your fabric stash are washed, and which aren’t?

I used to prewash before each project. Oh, how annoying! I’d be all jived about starting something new, only to find myself in prewash slow-motion. And then there were those times I forgot to prewash. Problems! I also used to rationalize that some projects don’t require prewashing, which is true. If you’ll only handwash your project, a machine wash and dry is not necessary. But, then the scraps from that project won’t be prewashed. If you use them along with other scraps, project #2 is going to shrink very oddly. So, save yourself the brain power and prewash before ever putting your new fabric away!

(P.S. prewashing removes yucky chemicals from the manufacturing process, so it’s always doing some good, regardless).

How I Prewash
First I prep my fabrics by unfolding them and placing them in separate delicate bags. The bags prevent the fabrics from tangling with each other when the edges start to unravel in the wash. If you just throw 5 cuts of fabric in the machine together with no prep, you’ll spend quite a while cutting all the threads and then longer mourning the loss of so much fabric edge. Sometimes I have to double up, placing 2 cuts in 1 delicate bag. Doubling up is OK, but anymore than that causes madness.

Prewash

By the way, I tried preventing the unraveling edge tangle by clipping the corners of each fabric cut. That didn’t do squat for me. I’ve also heard of cutting each edge with pinking shears. I think this would work very well, but it’d be time-consuming for sure. I don’t even have a nice pair of pinking shears…

Next, I wash my fabrics on “light” with a little detergent. The detergent will help lift the manufacturing chemicals. I wash on cold, because I’m determined to never wash something I’ve made on hot. If you know you’ll be washing projects on hot, you need to prewash in hot water. Hot water is more likely to cause color bleeding, so use a color catcher to protect your fabric purchase.

Then, machine dry until almost dry.  Nope, you can’t hang dry because it’s the machine drying that will cause shrinkage.  You want to make the fabric shrink now, not later.  I like to remove my fabrics from the delicate bag and put them back in the drier for 15 more minutes. This releases creases that are otherwise quite hard to iron out.  Iron your fabric asap and while it’s still just slightly damp so that those creases don’t get heat set in the dryer!

Clipping & savings

Confession – I save my unravelled threads.  They’re so soft and spongy and pretty!  My daughter occasionally wants stuffing for her sewing projects.  This’ll be perfect.  Besides, I feel better not throwing it away.

Fold & Store
Folding – so obvious. But, what I want to suggest here is that you choose a particular folding style and stick to it. Every fabric store seems to fold and ship fabric differently. If you want your fabric to store nicely in the cabinet (which you so totally do, right?) you need to be consistent. Some people use a quilting ruler to fold with, as a template. I simply eyeball it, knowing the shape I aim to achieve.

Do you think he's helping?

Store your fabric somewhere out of the light and protected from dust. A cabinet or drawer is ideal. Make sure you peak in at it often to check that it’s happy ;0). Arrange and rearrange to achieve optimal viewing pleasure.

Read Full Post »

Oh my, how I’ve enjoyed hand quilting Aria’s Fairytale Patchwork quilt!  The entire process has been so relaxing and satisfying, especially experimenting with different quilting patterns.  Here are a few new ones.

Quilted Diamonds

This pattern, quilted diamonds, ended up being my favorite style for quilting on the Princess and the Pea blocks.  It looks especially nice on this Diamond Mine (from Anna Maria Horner’s Little Folks collection) block, which actually inspired the quilting pattern.

Quilted Star

Here’s another fun one.  I only used this star pattern on a few unicorn blocks, as I came to the idea a bit late in the game.  I like how it works with the layout of the print!

Quilted Frame

And, a simple pattern.  It creates a clean-lined, understated effect that works on almost any block.

I’ve been asked how long the hand quilting takes.  Let me start by saying that 95% of the time, I was stitching while watching a show with my husband.  So, given frequent breaks to watch the screen and an overall level of comfortable distraction, each block took me about 45 minutes to complete.  I would begin a block by marking my stitch lines with a chaco pen, and then carefully centering the block in my quilting frame.   On the few occasions that I stitched sans TV, the work came along much faster.

I have now completed all 26 blocks.   The overall effect is fairly random, since I varied the quilting patterns enough so that no 2 touching blocks share the same pattern.  So, now, at last the quilt is finished.  And, for some reason that makes me sad.  I think I’ll just so miss the hand quilting!  How can I watch Alias empty-handed?  It just won’t be the same.  I definitely need a new handwork project.

Although this quilt is a gift from my  mother and I for Aria’s November birthday, we’ve agreed to give it to her now.  She’ll be so excited!  I’m dreaming of making a pillowcase from extra fabric scraps for a  birthday surprise.  Shhhhh!

******

Today at home.

Today at home

Delight

Delight

And, a new book to read, thanks to my sweet mother in law.

Read Full Post »

Last night I finished another patchwork Christmas stocking.  Here’s the little gingerbread boy.

Liam's stocking

And, drumroll please…., when I sewed the little hangy loopy thing, I got it right the FIRST time.  Oh, yes, it’s the little things :).

stockings threeOne more to do and we’ll be complete.

But, tonight I don’t feel like sewing.  I feel like reading.  I browsed at the library for at least 30 minutes today trying to find the right book.  Nothing.  Now, after doing some looking online, I have 2 good ones on request.

So, I guess it’s the couch for me tonight.  I’ll be posting an update on the hand quilting soon!

Read Full Post »

I am so glad that our first round of charity quilt-making with do. Good Stitches is finally here!  I started the Flickr group in June, and was thrilled to see so many kindred spirits join up to do some good.  Because of summer travel plans, we decided to wait out July and make our first quilt this August.  I’ve been chomping at the bit to start!

{If you find yourself wishing you had joined in time, don’t hesitate to contact me!  I’m making a list for do. Good Stitches Too, a second group I expect to launch this fall.}

Piecing in Aqua & Red

So, without further ado, let me tell you what we’ll be making!  This first month, I am quilting.  I settled on a Red & Aqua Sampler Quilt.  The concept is simple:  each bee member will make 2 blocks in aqua and red.  But not just any 2 blocks!  The blocks must be made in the same block style (log cabin, square in square, flying geese, etc) and the block style must be a straight, non-wonky design.  So, block styles with rectangles, triangles and squares are perfect.  Blocks incorporating curves and irregular (ie wonky) cuts are out.  I imagine that this sampler style will allow the completed quilt to feel harmonious, even though each member is sewing with her own fabrics, which will obviously vary quite a lot! 

do. Good Stitches - Round 1

Completed 12″ blocks are to be mailed to the quilter (that’s me) by August 31st.  But I hope folks send them in early, because I can’t wait to start putting this together!  I’m committed to finish the quilt by the end of September, when I’ll mail it to Wrap Them in Love.  From there the quilt will make it’s way to a child in need of warmth and love!

Here are my finished blocks for round 1.

Red & Aqua Sampler Quilt blocks

The cycle begins anew in September, when our next quilter will launch a new quilt.  Yah!  By the way, there are two levels of bee membership, which you can read about here.   If you want to help by making blocks, but aren’t prepared to finish a quilt, you can sign on as a “stitcher” only when we launch the next charity bee!

Read Full Post »
Gingerbread Boy

Mama (that’s me):  “Look, Liam, I’m sewing this gingerbread man for your Christmas stocking.”

Gingerbread boy

{Happy Pause…  I start to round the first leg}

Liam:  “Mama, is that a boy or a girl?”

Mama:  “It’s a boy.”

Liam (concerned):  “You’re sewing through his private parts?”

Mama: “……?”

Liam (laughing):  “Mommy, you’re sewing his private parts!!!”

Mama:  “I don’t think gingerbread boys have private parts.”

Liam and Aria in unison:  “Yes, they DO!”


Really, what do you say?

Read Full Post »

Oh, I so wish you could have been here last night!  A group of 8 super fun ladies met at my house for a crafty social of sorts.  Cookies + Crafts + Friends = a Perfect Night! 

Sewing Bits & Pieces

So, what did we do?  Fabric gift tags – an easy, instant-gratification project from Sandi Henderson’s Sewing Bits and Pieces.

Fabric Gift Tags

Following Sandi’s instructions, we layered cardstock, then plastic wrap, then fabric and used a dry iron set on high to melt them together.  Once fused, simply cut into desired tag shapes, add decorative stitches and finish with a scrapbooking brad (also called an eyelet).  To use, write any message on the cardstock side of the tag.  The eyelet is for tying the tag to your gift.

Although we used 2 different types of plastic wrap, we couldn’t seem to make a permanent fuse.  So, it turns out that the decorative stitching was more necessary than optional.  That’s ok, it got some of our no-sew ladies a bit more friendly with the sewing machine!  Hand stitching with embroidery floss was a very nice option too.  If I were to do this project again, I’d buy a product designed to fuse, rather than using the plastic wrap.

some of my gift tags

Here are a few of mine.  I was going mostly for Christmas tags, since that seems to be a theme with me lately.  This fabric is one I received in a Holiday Scrap Pack from Sew Love Fabrics.  With all the fun graphics, it was perfect for tag-making, don’t you think?

a little Anna Maria Horner love

Check out these tags made by my friend Hannah!  She blew us away with her creativity and productivity.  I think she made like 20 tags!  And more than half of them were from my scraps of Anna Maria Horner’s Good Folks collection.  Kindred spirits, Hannah and I.  Anyhoo, as the night wound down she broke out the colored thread and used every one of my machine’s fun stitches to finish her tags with lots of personality.  I wish you could see them all.

Aaaah, good times!  Now I’ve got to keep my eye out for another easy project for crafty social take 2 sometime this fall.

Read Full Post »

Today I discovered a common thread.  I’ve been loving quilts with a certain look… lots of color, contrast and an emerging design.  Turns out I love value quilts.

A value quilt is a design that plays on value – the lightness or darkness of a fabric, regardless of color.  Here’s one of my favorite examples.  It’s by Naptime Quilter:

values quilt top

Her quilt reminds me of my Colorbrick Quilt.  So much color and happiness!  But unlike Colorbrick, where I agonized about color placement for ages, a multi-colored value quilt usually goes together with little regard for color.  Basically, you separate your pieces into light and dark values and them piece them spontaneously, trusting the values to make the quilt shine.  Here are some more of my favorite value quilts in a smorgesboard of color.

1. Value quilt in progress, 2. Values quilt is finished

I’ve also seen some beautiful value quilts that use color and value.  This one is stunning.  See how each block is one color in many shades (or two complimentary colors) with values from light to dark?  Amazing, right?!?

Streifenblöcke - Blocks of stripes

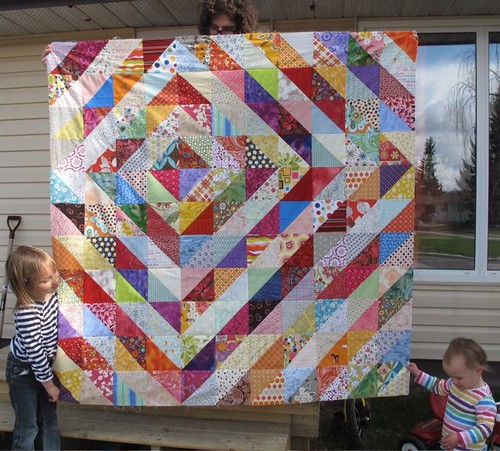
And here’s a simple squares quilt, using half square triangles.  Jeni of In Color Order created her squares with mostly dark value warm colors set against mostly light value cool colors to create a lovely effect.  I think I’d like to see this done with all dark value warm colors vs. all light value cool colors.  Would it be more fabulous or less so because of the predictability?  Hmm….

DQS9 Top Finished!

Here are a few more value quilts where color is central to the design.

1. scrappy sunrise, finished, 2. the summer bling quilt

If you’re feeling the value quilt love, you should check out the Sew Katie Did tutorial.  It looks like she inspired a whole run of value quilts!  Now, I just need an excuse to make one?  Or do I?

Yes, I do.  Well, Liam’s birthday is in February….

Read Full Post »

Did you think I forgot about those Christmas stockings?  It’s true I’ve spent more time hand quilting the Fairytale Patchwork quilt than doing any other sewing, but I have made progress on the stockings, here and there.  When last you saw, my first stocking looked like this:

Christmas Stocking in Progress

The next step was to embroider “Rachel” up top.  Making use of a light table, I traced a print out of my name in “Dauphin”, one of my favorite fonts.  To embroider this font, which has irregular thickness, I switched between a back stitch and chain stitch as I followed each letter.

on July 4th

Such a portable project!  I worked on it on July 4th while waiting for dark.  But, um, I had to take out all those stitches because I’d done them in full strand embroidery floss.  Oops, gotta remember to separate those strands!  Anyways, here’s the finished embroidery.

Stitching Up close

And, voila, my first finished patchwork Christmas Stocking!

First Finished Stocking

Now that I had done one, the next came more easily.    Here’s Aria’s done in lots of Tufted Tweets and a little Heather Ross, Far Far Away.

Finished #2!

Aria’s been grumpy about my choice of fabrics for her stocking.  She doesn’t understand why I’d use fabric with pictures of chairs and birds.  You should hear her go on about the birds so disparagingly.  Why not princesses and unicorns, mom?  Sheesh.  But, I won her heart with the embroidery.  Her eyes lit up just imagining presents with sparkly silver bows!

Sparkly Presents for girlie

When I was finished, she smiled and admired her stocking, but did point out that the purple wildflower fabric (a scrap from her Far Far Away quilt) is her favorite.

All in all these patchwork Christmas Stockings are a super-fun and relatively quick project.  After the embroidery work is done, I can put together the stocking in one evening.  I’ve used a piece of muslin as a base for the patchwork, which I sew on in horizontal strips after doing any piecing required.  Each stocking is backed in a solid color and finished with a little linen loop for hanging.

2 Down, 2 to go

But, darn those loops – they’re the hardest part!  It took me 5 tries to get the first one sewn on and 4 tries on the second one.  It’s amazing how many ways there are to mess up the orientation of that loop!  Several times I’d leave a little bit of the edge exposed on the right side of the seam.  I even sewed the loop inside the stocking the first time I tried!  On Aria’s stocking, I sewed the loop on the wrong side of the stocking.  These are the moments when I wonder how I ever did so well in school.  But, now I have conquered two loops.  Hahahaha (evil chuckle). Wish me luck on the next two.

Read Full Post »

Two Quick Things

#1  If you’ve clicked over here from Rosie Girl Dreams, you can find my interview with her at my business blog, EuphoriaBaby.com.  Jeanine was way fun to chat with!

#2  I just noticed that today is the last day of Sew Love Fabrics‘ summer sale – Buy 3, get 1 Free on all sale items (there’s over 100).  If you were planning on getting some goods, better hop to it!

I’ll be back soon with a sewing update…

Read Full Post »

Older Posts »